
Turning the buttons in time for effective processing
A poultry processing plant is an industrial facility. All the stages in the entire process, together determine the effectiveness of slaughtering and the quality of the end product. By critically monitoring and controlling 12 key aspects, quality, safety and yield of the processed birds can be improved significantly.
By Eduardo Cervantes Lopez, International Processing Consultant, Barranquilla, Colombia
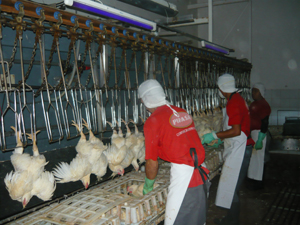
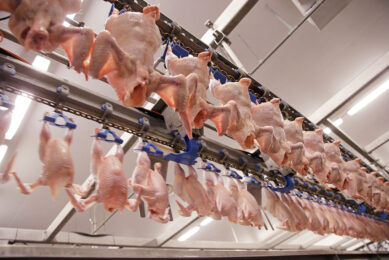
1 Hanging on the conveyor
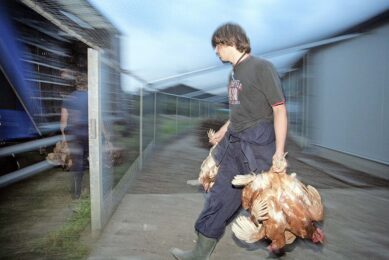
The reception zone in the plant must be dark, in order to keep the birds calm. However, in order to prevent eye fatigue of operators, special 5-filter blue lamps may be used instead of regular lighting. Since chickens are blind to ultraviolet light, they will not be affected by this type of illumination in the area, thus preventing them from flapping as they are hung onto the shackles by the operators.
The reception zone in the plant must be dark, in order to keep the birds calm. However, in order to prevent eye fatigue of operators, special 5-filter blue lamps may be used instead of regular lighting. Since chickens are blind to ultraviolet light, they will not be affected by this type of illumination in the area, thus preventing them from flapping as they are hung onto the shackles by the operators.
If this area does not meet the above important specifications, chickens flap excessively during the transportation to the stunner. Flapping demands higher effort, as the heart has to pump more blood to the muscles of the breast and the wings. Depending on how strong the flapping is, the amount of blood that accumulates in the wings varies. When flapping is too strong during the bleeding, there is not enough time to evacuate the blood: some of it remains in the joint between the humerus and the radius/ulna, as well as at the tip of the wings. This undesirable quality condition becomes evident when the birds leave the last plucker.
2 Hanging to stunning
When the time between the last hanger operator and the entrance to the stunner is longer than 20 seconds, blood starts to accumulate in the neck and the wings due to gravity. If during the bleeding, the blood is not evacuated, some amount will remain in the wings. As the heart loses pumping efficiency, only gravity is there to help. For this reason, it is impossible to move the blood through the V-shaped elbow joint, so it will accumulate in this area. In order to reduce this problem, it is necessary to monitor the flapping and the darkness in the hanging zone.
When the time between the last hanger operator and the entrance to the stunner is longer than 20 seconds, blood starts to accumulate in the neck and the wings due to gravity. If during the bleeding, the blood is not evacuated, some amount will remain in the wings. As the heart loses pumping efficiency, only gravity is there to help. For this reason, it is impossible to move the blood through the V-shaped elbow joint, so it will accumulate in this area. In order to reduce this problem, it is necessary to monitor the flapping and the darkness in the hanging zone.
3 Good stunning
One of the conditions that confirm a good stunning is that the birds exit the stunner with the neck a little bent. This particular position of the neck is not an issue for a manual slaughtering operation. However, if an automatic slaughter machine is on service, then the neck needs to be extended before the chicken enters the slaughtering machine. Failure to do the above will result in some necks not passing through the machine; personnel checking for proper slaughter after the equipment will have additional workload. This situation increases the risk of some birds entering the scalder alive and drowning.
One of the conditions that confirm a good stunning is that the birds exit the stunner with the neck a little bent. This particular position of the neck is not an issue for a manual slaughtering operation. However, if an automatic slaughter machine is on service, then the neck needs to be extended before the chicken enters the slaughtering machine. Failure to do the above will result in some necks not passing through the machine; personnel checking for proper slaughter after the equipment will have additional workload. This situation increases the risk of some birds entering the scalder alive and drowning.
Some plants with automatic slaughter equipment have installed a piece of stainless steel sheet at the exit on the bottom of the stunner. The sheet is connected with the same power supply of the stunner. As the neck slides over this sheet, the electricity helps to extend it. This is the proper condition for automatic slaughter.
4 Rinsing before scalding
Before the birds are hung on the slaughter overhead conveyor, their feathers and skin have residues of dry faeces. If hanging, stunning and bleeding are not proper, the chickens evacuate faeces again as a physiological reaction due to the trauma they suffer during these three operations. In consequence, when they enter the scalder the amount of organic load of the water increases.
Before the birds are hung on the slaughter overhead conveyor, their feathers and skin have residues of dry faeces. If hanging, stunning and bleeding are not proper, the chickens evacuate faeces again as a physiological reaction due to the trauma they suffer during these three operations. In consequence, when they enter the scalder the amount of organic load of the water increases.
This circumstance increases the risk of cross contamination: during scalding, some pathogen bacteria like E. coli and Salmonella can enter through the beak and the cut on the neck, affecting the shelf life of the processed chickens.
This special high risk condition can be mitigated if the birds are washed and brushed using an antimicrobial product before entering the scalder.
This special high risk condition can be mitigated if the birds are washed and brushed using an antimicrobial product before entering the scalder.
5 Air water agitation of the scalder
In the past, scalders used mechanical agitation and some scalders with this technology are still in operation. New scalders use air injection through the bottom of the machine. Air injection reduces water density, which keeps birds submerged during scalding. Furthermore, the water agitation is constant during the chickens’ transit through the scalder. Proper agitation facilitates feather removal, because it opens the follicles completely, helping proper denaturation of the feather protein released. In addition, there are savings in energy and maintenance that represent a reduction of the operational costs.
In the past, scalders used mechanical agitation and some scalders with this technology are still in operation. New scalders use air injection through the bottom of the machine. Air injection reduces water density, which keeps birds submerged during scalding. Furthermore, the water agitation is constant during the chickens’ transit through the scalder. Proper agitation facilitates feather removal, because it opens the follicles completely, helping proper denaturation of the feather protein released. In addition, there are savings in energy and maintenance that represent a reduction of the operational costs.
6 Using warm water
The scalding operation increases the chicken’s body temperature. This condition facilitates the opening of the follicles and feather release. When the additional body heat is not maintained after the birds exit the scalder and during plucking, the chickens will gradually cool down. The follicles will close again, tightening the feathers. This is the reason why in many plants, the bodies of the pluckers are adjusted to increase the pressure against the chickens, in order to remove the hard feathers of the tail and wings. The unfortunate complement of this decision is the increase of the temperature of the scalder water.
The negative consequences on the quality and yield are:
• Breast over-scalding. It appears as a series of white stripes on the surface of the pectoral muscles. These stripes contain proteins denatured by the excessive heat.
• Subcutaneous fat melts away and is lost. This reduces the yield by about 0.5% to 2.0%.
• The skin is more fragile during plucking. Some birds leave the pluckers with torn skin. Sometimes, the humerus bone also breaks the skin close to the clavicle joint.
By spraying warm water, 36 to 40ºC, plucking is improved. Therefore, it is possible to reduce the temperature of the scalder water by at least 1ºC, thus reducing operational costs.
7 Keeping the heat
To better conserve the extra body heat after the birds exit the scalder towards the pickers and in the spaces between the picker machines, it is necessary to cover those gaps with a plastic tent. This installation is similar to a thermal barrier: since the environment is usually cooler than the chickens, this gradually cools down the birds. When the process has finished, the tent can be lifted for cleaning purposes.
To better conserve the extra body heat after the birds exit the scalder towards the pickers and in the spaces between the picker machines, it is necessary to cover those gaps with a plastic tent. This installation is similar to a thermal barrier: since the environment is usually cooler than the chickens, this gradually cools down the birds. When the process has finished, the tent can be lifted for cleaning purposes.
8 Wing scalder
When the chickens are processed at a medium or high speed or if yellow birds – with the epidermis – are being processed, it is necessary to have more than one plucking machine. In this case, to remove the feathers of the wings, a wing scalder is required, in order to keep this area of the birds hot. For this reason, this special scalder is located between pickers number 1 and number 2.
When the chickens are processed at a medium or high speed or if yellow birds – with the epidermis – are being processed, it is necessary to have more than one plucking machine. In this case, to remove the feathers of the wings, a wing scalder is required, in order to keep this area of the birds hot. For this reason, this special scalder is located between pickers number 1 and number 2.
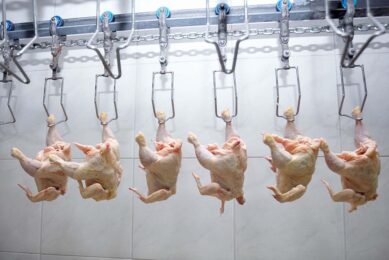
9 Length of the neck cut
An imaginary line drawn from the humerus-ulna/radius joint of one wing to the other, while the bird is hanging on the shackle, is a good reference point to cut the neck. With this strategy it is possible to leave approximately 1 inch (20 grams) of the neck attached to, and sold as, the rest of the chicken, improving the profits. Therefore, plant managers shall monitor this practice during the process.
An imaginary line drawn from the humerus-ulna/radius joint of one wing to the other, while the bird is hanging on the shackle, is a good reference point to cut the neck. With this strategy it is possible to leave approximately 1 inch (20 grams) of the neck attached to, and sold as, the rest of the chicken, improving the profits. Therefore, plant managers shall monitor this practice during the process.
10 Pre-chiller water temperature
When carcasses enter the pre-chiller, their follicles are open, due to the high body temperature. When they are submerged in the water, besides washing to remove any traces of extraneous materials, a process of water uptake starts. The level of water uptake (%) depends on the water temperature. Cold water reduces the gain uptake. On average, the follicles can keep 25% of the total water uptake. The pre-chiller is used to start lowering slowly the temperature of the carcasses, to prevent rapid shortening of the muscle fibres that causes stiffness in the cooked meat.
When carcasses enter the pre-chiller, their follicles are open, due to the high body temperature. When they are submerged in the water, besides washing to remove any traces of extraneous materials, a process of water uptake starts. The level of water uptake (%) depends on the water temperature. Cold water reduces the gain uptake. On average, the follicles can keep 25% of the total water uptake. The pre-chiller is used to start lowering slowly the temperature of the carcasses, to prevent rapid shortening of the muscle fibres that causes stiffness in the cooked meat.
11 Water agitation during chilling
Before the modern screw chillers, which incorporated the new air-injection technology to agitate the water, arrived on the market, the old paddle chillers were in operation everywhere. Researchers have found that with paddle chillers the water agitation was not good enough to prevent the formation of a thermal-protective layer on the surface of the carcass. This layer of warmer water insulates the carcass and reduces further heat exchange between the carcass and the water. By injecting air through the bottom of the chiller tank, bubbles are created as the air moves towards the water surface, thus agitating the water and preventing the formation of the thermal layer on the carcasses.
Before the modern screw chillers, which incorporated the new air-injection technology to agitate the water, arrived on the market, the old paddle chillers were in operation everywhere. Researchers have found that with paddle chillers the water agitation was not good enough to prevent the formation of a thermal-protective layer on the surface of the carcass. This layer of warmer water insulates the carcass and reduces further heat exchange between the carcass and the water. By injecting air through the bottom of the chiller tank, bubbles are created as the air moves towards the water surface, thus agitating the water and preventing the formation of the thermal layer on the carcasses.
12 Proper carcass chilling
There are four conditions which are necessary to always achieve a proper chilling: time, water temperature, total immersion and water agitation. The temperature of the carcasses at the exit of the chiller should be about 2ºC. The target temperature before carcasses enter the coolers should be at a maximum of 4ºC, in order to reduce shrinkage and avoid a higher energy consumption to remove the extra heat.
There are four conditions which are necessary to always achieve a proper chilling: time, water temperature, total immersion and water agitation. The temperature of the carcasses at the exit of the chiller should be about 2ºC. The target temperature before carcasses enter the coolers should be at a maximum of 4ºC, in order to reduce shrinkage and avoid a higher energy consumption to remove the extra heat.
Join 31,000+ subscribers
Subscribe to our newsletter to stay updated about all the need-to-know content in the poultry sector, three times a week.


 Beheer
 WP Admin
  Bewerk bericht